The Visual
Approach
In this class we cover the visual approach. A
visual approach is an IFR procedure, used when weather allows, to
expedite air traffic flow in a terminal airspace. A visual approach can
be used with both precision approach runways and non-precision approach
runways.
Some runways have published visual approaches, the
JFK Parkway
Visual is one such challenging example, and the one we will look at
specifically.
The principles are the same, whether the visual
approach is a published one or not, and you will be flying
non-published visual approaches most of the time. For an unpublished
visual approach, you will be given approach clearance once you report
having the airfield in sight on the "base" segment, sometimes when on
"final" or the "downwind" part of the approach. Once given clearance
for the visual approach, you have reasonable freedom to just fly the
plane and land. See the Pattern Practice
class for a discussion of what these segments are, and for the basics
on how to fly such an approach.
In this class we will teach you about:
- What info is needed before the approach
- Flying the example approach
- The “aiming for the runway” part
Necessary
Information
In this class we will use the JFK
Parkway Visual Rwy 13R/L, and land on 13R as the example. Again, we
have choosen a fairly complicated procedure, to illustrate some points.
It’s
important that you read and become familiar with the procedure before
you
perform it. You should look for this:
- Are there any VORs or NDBs along the approach
path you
can use?
- Is there an ILS for the runway?
- Are there any altitude references?
- Which visual reference points should you be
looking for?
- Any other necessary information
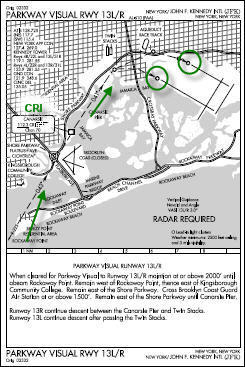
If we look at the example, you will find this:
- You can use the CRI (Canarsie VOR) on the
223° radial, then the 041° radial.
- You should be at or above 2000ft over Rockaway
Point and at or above 1500ft when you cross the closed Brooklyn Coast
Guard Air Station.
- Rockaway Point is your first reference where
you
should be at or above 2000ft. It also states that you should be east of
Kingsborough Community College, and then be at or above 1500ft when you
cross Coast Guard station. You should also remain east of the Shore
Parkway until you pass the Canarsie Pier. When between the Twin Stacks
and the Canarsie Pier, you should start
the descend if you are bound for runway 13R. If you are bound for 13L,
you should descend after passing the Twin Stacks.
- It has a weather minimum of a cloud ceiling at
or
above 2,500ft and a visibility of 3 miles or more.
Flying the
example approach
ATC has now vectored you and cleared you for
the Parkway Visual to runway 13R. Once cleared for the approach you may
leave your last cleared altitude, and you need to start navigating to
land
on the runway. Even if you will be flying it by
visual reference, you must also tune any available navaids as
backup. Always have as much navigation information as possible to
crosscheck your location. Remember, there are nasty things, like radio
towers, quite willing to get in your way.
Here is how you
would utilize the navaids:
You tune up CRI VOR on 112.30 and set your course
knob to 043. At this point you can choose whether you want to use the
autopilot or fly it by hand. If you want autopilot help, switch on the
NAV button. If not, use the magenta center bar for reference.
When you
are
over Rockaway Point you may descend from 2000ft to 1500ft. Rockaway
Point is about 4 NM DME from CRI (use the scale chart at the bottom of
the map). When you cross CRI, you should set the course to 041. If you
are using the autopilot, press the BC (Back Course) button, or be sure
to set the front course, depending on how your panel works.
You should
be at or above 1500ft when you cross Canarsie Pier, which is about 1 NM
DME from CRI. Then your next descent should be between the Twin Stacks
and the Canarsie Pier, which is about 2-2.5 NM DME from CRI. And
finally, about 4 NM DME from CRI you should start turning towards the
runway 13R.
And this is how you
would use the "out the window" navigation:
When you cross Rockaway Point, which is at the tip
of Rockaway Beach, you should be at or above 2000ft. You may also start
descending to 1500ft at that point. You need to remain west of Rockaway
Point, and east of Kingsborough Community College.
When you cross the
closed Brooklyn Coast Guard Air Station, you should be at or above
1500ft. As you continue, you should remain east of the Shore Parkway
until you cross over the Canarsie Pier. Then, half way between the
Canarsie Pier and the Twin Stacks, you should start descending for the
runway. The next part requires a bit of timing and, if you are flying
at night time, then you follow the approach lights. You now decide when
to make the final turn to the runway.
Aiming for
the runway
This can be important.
We have already covered the instrument guidance
systems in the previous
class. Even if you are performing a visual approach, if an ILS or VOR
or NDB is available to guide you, you must have these tuned as backup.
Most runways have approach guidance lights. More
commonly at smaller airports, you may find a two light VASI (Visual
Approach Slope Indicator). There is one light at the start of the
runway, and another 20 ft along the runway. A more accurate system is
the four light PAPI (Precision Approach Path Indicator) system. These
lights are oriented perpendicularly to the runway, and are shown below.
There is tremendous variation in these types of systems as you travel
the world.
The four light PAPI is what you will encounter
most of the time in North America, at the airports you will fly with
UVA. This consists of an array of 4 lights, usually to the left of the
runway.
They shine white or red. If you are on the glide path, you will see two
white and two red, if below, one and then both of the white lights will
become red, and vice versa.
Your visual aiming point still remains the two
large
white solid rectangles. When descending on the glide slope pick a
spot, say
1/3rd
of the way up your windshield. Maybe there is a convenient irregularity
on the center pillar to visually "mark" it. Best not to get out those
Magic Markers. Now, keep the large white rectangles even with that
spot. If they slip below your mark,
then you are too high, slip above your mark, and you are too low. Keep
adjusting gingerly and continually as you approach.
As you fly over the threshold and are getting
ready to retard the throttle and start your flare, switch your gaze to
3/4rds of the way down the visible runway. The technique was described
in the previous lesson.
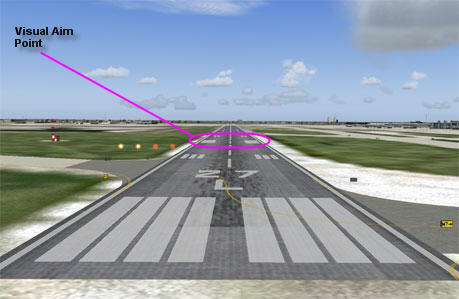
You see
the PAPI to the left, we are right on target
This requires a lot of practice. The very best way
to practice your takeoffs and landings is doing traffic
patterns. We explain what that is, and how to go about practicing it,
in the next lesson.
|