Primer
Home
Flight Planning
VATSIM
Get
Connected!
Departure
Navigation
Arrival
ILS
Approach
Visual
Approach
Pattern
Practice!
UVA Main Page
Flt
Stds & Training
|
Pattern
Practice!
Perhaps
not so exciting, but certainly a critical facet to improving your
flying.
In this class you will learn about:
- The Pattern, or for our European friends The
Circuit
- Why it is so critical
- What you should be doing on each leg
- How to go about practicing it
Why the
Pattern?
Although this class comes last in this list, it really needs to be
first in your mind.
Fly a pattern well, and you will have taken a big
step to becoming a better pilot. Whenever you hop into a new plane, off
you
need to go for Pattern Practice! Even when you have been flying for a
while, there is nothing that sharpens the skills more than pattern
practice. In fifteen minutes or so, you will have executed an approach,
a takeoff and a landing, and are free to immediately continue the
pattern by doing a touch & go or go-around, for more.
Every time you execute an approach, landing and
takeoff, you are flying
parts, or all of a Pattern. If you can fly a pattern well, then you
will be able to fly the approach, land, and takeoff well. Makes sense,
eh?
Now think about this -- in a two hour flight, you
will only get one crack at the approach, landing and takeoff. Compare
that to pattern practice for two hours, you will have accompllished it
eight times! That is why pattern practice adds up to quick skills
advancement. There is no single better way to fortify your skills for a
checkride, than to include pattern practice as one of the components.
ATC will generally not make reference to a "pattern" when they are
vectoring
you IFR, but no matter what the approach technqiue, you will be able to
overlay this concept on any approach you will ever carry out. Once you
have
the concept of a pattern etched in your mind, you will find your
approaches and landings are much more controlled, organized and
successful.
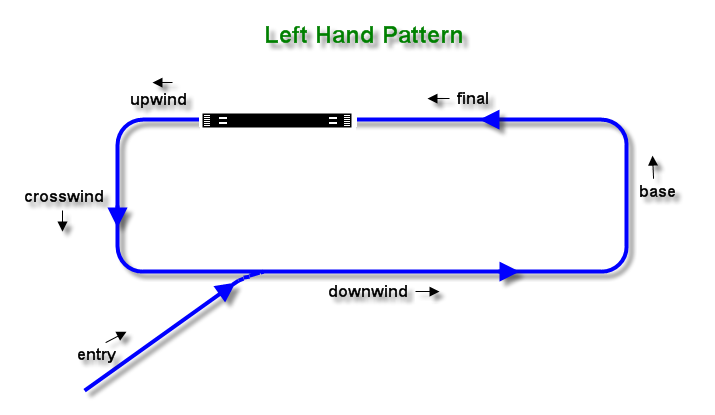
A pattern can be left hand, that is it consists of left hand turns at
each corner, or right hand. A left hand turn pattern gives the pilot a
better view of the runway as he circles and approaches. As such, left
hand patterns are the standard, unless dictated otherwise by terrain or
other external issues.
The parts or "legs" of a pattern are the upwind, crosswind, downwind,
base, and finally - the final leg. When you takeoff (or go-around) you
are flying the upwind leg. As you approach the runway to land, you will
be flying the final leg.
You can imagine a pattern with a 2nm final, for a small aircraft on a
tight VFR approach. You can also imagine a pattern with a 20nm
downwind, and a 20nm final leg, like for an airliner at a very
congested airport. A large rectangular Conga-Line in the sky. Think of
all of these as patterns. You can stretch the rectangle this way or
that to fit.
There are many ways to exit and enter a pattern, you will learn these
as you advance your flying career. Flying airliners, you will normally
exit the pattern with a straight out upwind flight, or occasionally a
significant left or right turn, immediately on wheels up.
ATC will
vector you to enter the pattern, perhaps on the downwind, or onto the
base leg, or even a straight in approach directly onto the final leg.
It depends on your direction of flight, and the traffic situation at
the airport.
Let us now say that you are on approach to an airport. It doesn't
matter
where you enter the pattern, or how you get to a certain part of a leg,
the technique is standard. Meaning, that if you are flying correctly,
you will be doing pretty much the same thing with your aircraft in
terms of speed, flaps and gear deployment at a given point in the
pattern. The same goes for the takeoff. Now, of course there can be
variation in altitude and to some extent speed, depending on the needs
of ATC, but the basics are constant. Once those concepts are cemented
in your mind, they will become almost automatic. No matter what you
need to accomplish, just take that pattern and rubber band it over what
you need to do, and there you go, you know what to do.
The
Technique
We explain the proper approach, takeoff and landing techniques in other
sections ( Departure, ILS Approach, Visual Approach), but let us
review
this from the specific perspective of each leg of a pattern. The
following is the
basic technique we expect to see on the checkrides. Sometiimes for
operational reasons you may need to vary the technque, but that is more
advanced flying.
Takeoff -
Upwind Leg
You are cleared for takeoff, you are on the runway, you have done the
runup and are now rolling. As you rotate at Vr speed, you liftoff and
start your climb on the upwind leg. You are holding your airspeed a
little faster than V2 by varying your pitch, your engines are at take
off thrust, and your flaps are at takeoff setting. Your gear will be
retracted once you increase past 1000fpm - "at positive rate". Note
that you do not set for a specific VS, you take whatever you get.
At acceleration height (1000ft AGL - UVA SOP), you pitch the nose down,
to accelerate to 250 knts, and clean up the flaps as you accelerate
past the
flap minimum speeds.
Takeoff -
Crosswind Leg
If you have an "immediate" turn on takeoff, you can execute this at
400ft
AGL, or very occasionally sooner where a SID calls for it. It will
typically not be exactly 90° left or right, but remember the
pattern
in our head is elastic, it will fit over any path we need to fly.
Landing -
Downwind Leg
As you approach abeam the airfield, you can optionally start to slow
down to 220 to 230 knts. In a large Boeing you can extend one click of
flaps (1°) to get a better view over the nose. Your gear is stowed.
Landing -
Base Leg
As you turn base, you need to slow to 180knts, extend flaps to 5°,
or
10° in a 747, or just one click of flaps in a small turbojet or
turboprop (about 9°). Your gear remains stowed. Typically you will
be
at 2000ft to 3000ft above the ground, but that is up to ATC.
Landing -
Final Leg
Let us say that you were turned to a 12nm base leg, meaning that the
runway threshold is 12nm distant from the base leg. As you reach the
end of the base leg, you turn (or you may be vectored) to intercept the
extended runway line
either by instrument or visual guidance. Your speed is 180 knts, and
you have
extended a bit of flap already on the base leg.
You now watch the glide slope. When it comes "alive", meaning that the
magenta triangle starts moving downward, drop your gear, slow to 160
knts and extend flaps to 15°, or 20° on a 747, or one click
short
of full landing position on a small jet or turboprop. (about 22°)
As a variation of this, you may find that you were vectored to a very
distant base leg, were quite high and intercepted the glideslope well
away from the airport. In this case, don't drop your gear and slow up
that early. Wait until you are 8nm to 9nm from the runway threshold to
drop gear, extend flaps and slow down to 160knts.
As you approach the FAF, and as the glideslope indicator starts to
reach center, you need to slow to your final wind corrected approach
speed (Vtgt), and deploy full landing flaps, 30° for the Boeings,
about 45° for the smaller aircraft. You must cross the FAF at the
correct height as noted on the approach plates.
Now you establish a stable final approach, and land!
The option
When doing practice patterns you may hear the clearance "Cleared for
the option". That means that you are free to choose what you will
do. You may "full stop land", meaning land and clear the runway
(don't STOP on the runway), "Touch and Go" - be sure the runway is long
enough, or "Go-Around". The latter two options will let you continue to
practice, and practicing go-arounds is important in its own regard, as
sometimes you will need to execute a last minute go-around due to
runway or weather issues.
How to Practice
Well, first you need to pick an aircraft, pick an
airport, and set some weather. Alternately you can just go with what is
actually there, real-time. Often it is a good idea to pick an airport
with
lots of flat terrain surrounding it, gives you more room to play. Or
you can pick airports with terrain, for more of a challenge.
Where
You can practice offline, or online. If you wish
to do patterns on VATSIM, be sure to pick a quiet airport, the Tower
or Approach controller will probably appreciate the traffic! Do not
expect
to be allowed to do pattern practice in a busy Terminal Airspace,
especially during a major event.
How
As an example pattern, you can
takeoff, fly upwind to
acceleration height (1000ft). Then turn
crosswind for about two minutes while climbing to 3000 ft AGL, then
turn
downwind. As you approach abeam the airfield on the downwind, start a
descent to 2000ft AGL. Turn for a 12nm base, intercept the extended
runway line and then descend from 2000 ft AGL and land. You can do a
touch and go, or even practice your go-arounds, to keep it going.
Normally in the pattern you would stay at the pattern altitude, which
is typically 1000ft AFE for pistons and 1500ft AFE for turbines. But
this, for example, will give you extra practice in descent and a
cllimbing turn. Mix it up a bit too, changing the altitudes and the
lengths of the various legs, flying a right hand pattern as well as a
left hand pattern.
The Autopilot?
You can start out using the autopilot, but observe carefully what
the plane is doing. Then turn the autopilot off and fly by hand
assisted only by the Flight Director, as you need to for a checkride.
Try to stay within 300 ft of your desired altitude at first, and then
within 100ft, or even 50ft like the pros.
Here is a challenge
that will really get you in tune with the
plane. Once you have a good handle on the engine power needed for the
various segments, then turn off the A/T too, and fly it all yourself,
"one hand on the yoke and one on the throttle".
Concentrate on your
handflying in the pattern,
but don't ignore your autopilot approaches either, George needs
practice too. If you have full
autoland capability, then practice those as well.
Real IFR Practice
Now it's time for the foggles,
or the hood!
You need these in fair weather conditions in the RW to simulate poor
visibility, to allow for practice. We can actually select and set our
own low visibility conditions, so of course we don't need these. Just
hit Alt|World|Weather, set User Defined,
and slide the visibility to 2nm, then 1nm, but no less than 1/2nm if
you are not going to do a full autoland.
You will be surprised at two things, how badly you do the first time
through, and how much you improve after even just a few of such
low-visibility hand
flown approaches. It gets you to focus on, and really use the
instruments for guidance.
Change it up!
But, always try to vary what you do, remember to keep stretching that
rubber band.
Try different leg lengths, different altitudes, different weather -
winds and visibillity, different directions, different types of
approaches, different
aircraft, you name it. But also remember, never vary the basic
components to
the flying, they must remain constant, and will become second nature.
They will be there when you need them!
And, most
importantly, Have Fun, and watch your piloting skills improve!

|