Navigation
The cruise may be the least exciting part of a
flight, but necessary. Its time to look at
the “cruise” and navigation part of a flight.
In this class you will learn about:
- The use of the Autopilot
- vasFMC
- AIRAC, Procedures & Flight Simulator
- Navigating with: VOR, NDB and DME
- METAR (Weather)
The Flight
Management System (Autopilot)
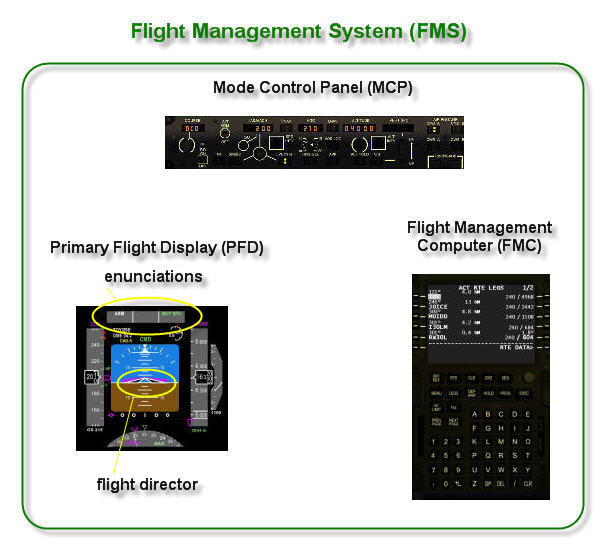
The FMS consists of the MCP (mode control panel),
the FMC (Flight Management Computer), the enunciations on the Primary
Flight Display and the smarts behind the scenes that you don't see.
These are Boeing terms, although the names of the components in other
aircraft may be a little different, the functions will remain much the
same. Only complex aircraft panels will include all of these items.
The FMC is used to input flight plans and give detailed instructions on
how an aircraft should fly, as well as what environment it may
encounter. Often, there may not be an FMC present in smaller aircraft
(in the real world), such as the turboprops that United Express flies.
The FMC is more the domain of the larger aircraft that fly longer
distances. In the simulation world, simple panels will not include
FMCs, even for large jets. To have an FMC included as part of the
simulated Flight Management System you have to get more complex
simulations that
are generally payware.
The PFD enunciations along the top, will show the
current and armed
status of the Auto Throttle (if there is one), the pitch mode and the
roll mode, as well as the Flight Director and AutoPilot status. You
will generally only find these on more complex panels.
The MCP is a fairly
direct way of controlling the aircraft's flight, and often people think
of this as the entire "autopilot". It can be used to
override the FMC, or it is used primarily if there is no FMC present.
The MCP can vary in
appearance from aircraft to aircraft and panel to panel, and in
particular can vary in function in simple as opposed to more complex
aircraft panel simulations.
|
My Panel Doesn't have all that stuff!
Not a problem!
There is now a wonderful workaround.
Free for the download, is a fairly full featured freeware FMC that
gives you lateral guidance
as well as vertical advisories, and it is easily added on to most
simple aircraft panels. Its name has changed recently, it is now called
vasFMC.
If you fly mainly default or other simple panels, you owe it to
yourself to have a look, your flying will never be the same again! See
the description below.
|
FS2004 737 Classic "simple" panel MCP
As an example, below is the FS2004 default
aircraft panel for the 737 Classic aircraft. Generally, MCPs contain
most of
the following components.
Flight Director
When enabled, it will show on the Primary Flight
Display the pitch & roll attitude
that the aircrft should hold, according to the
active settings. This is a great aid
when handflying your aircraft. Unlike in a small GA aircraft, it would
be rare that an airliner would
be flown just on raw data alone.
Autopilot (master switch)
Used for enabling the autopilot. If you turn
it off, the autopilot will no longer control the aircraft's pitch &
roll. The autothrottle is seperate from this, and will command even
with the
Autopilot disabled. The Flight Director will continue to show the
desired pitch & roll attitude on the PFD as well, even with the
Autopilot off.
Auto throttle (master switch)
Enables the auto throttle, turning it off will
switch the throttle into manual mode. Smaller aircraft, such as the
Turboprops and Regional Jet Turbojets usually do not include an Auto
Throttle. These are expensive items in the RW, and maintaince can be a
large headache. Paradoxically even some simple simulations of the
Regional Jets, will include an Auto Throttle, where one doesn't
actually exist in the RW.
Heading interface
Used for giving the aircraft a fixed heading
to fly. Adjusting the heading is accomplished by either clicking on a
knob
below the numbers or on the numbers themselves. Note that Heading is
not necessarily the Track. The Heading is the direction the nose of the
airplane is pointing. The Track is the path the aircraft
is actually flying, with reference to the ground, after being acted
upon by the current
winds. ATC will always ask you to fly a Heading, not a Track. Of course
when flying a Heading on your own, you need to be aware of the winds,
so that you can Track correctly towards your intended destination.
Course interface
Used with navigational equipment to set the
radial/heading to a VOR or ILS. Note that this is where the ILS front
course is entered.
Altitude interface
Used for setting a fixed altitude and/or the
vertical speed in ft/min. Note that the autopilot will level itself
when it gets close to the selected altitude.
VS mode is used for changing altitude, but
only in limited circumstances. Examples include short
climbs/descents such as changing to your next step altitude
at cruise, or the final part of a non-precision approach. VS mode can
also be used for idle power, or near idle power descents, if no other
option
is available.
VS mode can be dangerous because it can lead
to a
stall if not watched carefully, or alternately if used conservatively
to try to avoid this, VS mode will waste fuel and time by
climbing inefficiently.
LVL CHG (level change) mode, also labelled
FLCH, or its more mysterious
cousin VNAV should be used for most climbs and descents when available.
Although simple panels do not have such functions, happily
there are a variety of ways of getting around this. See the Traininng
sections on the forums for tips. vasFMC provides only advisory vertical
guidance.
Speed interface
Used for selecting a speed you wish the auto
throttle to command. It can be selected in either IAS (Indicated
Airspeed) or Mach. You will fly with reference to IAS below FL250, and
generally fly a Mach Speed above FL250. Note that
if the autopilot is turned off, the auto throttle will still hold the
commanded speed. Speed mode should also be seldom used, if your panel
allows for alternatives, namely LVL CHG or VNAV modes. Typically you
will still use SPEED mode when in late approach or on final.
NAV button
Used with the navigational equipment. You need
to tune a VOR or ILS, and select a radial/course for it. When NAV is
enabled, the autopilot will command the aircraft to fly on the selected
radial/course. Note, that it will only command the heading, not the
altitude.
APP button
Turning this on will enable the same feature
as the NAV button, and in
addition it will control the altitude according to the glide slope.
Note that it is only used for ILS approaches. This allows for flying
the ILS
with guidance down to 200 ft AGL, which is called a coupled approach.
Simple panels do not have an autoland function, and in any case true
Autoland is only available in larger aircraft designed to fly
long distances. 200ft above ground level is the Decision Height (DH)
for a
Cat I approach, if you can see the ruwnay then you turn the autopilot
off and handfly the rest of the way. If you cannot see the runway at
this point, then you must go-around. Without a full autoland
capability, you may not land if you cannot see the runway by 200ft AGL.
BC (Back Course) button
Used to engage the autopilot’s back course
approach mode. Functions just like approach mode, except the glide
slope is disabled and the autopilot’s response to a localizer signal is
reversed, e.g. if the localizer needle is offset to the left, the
auotpilot will turn the aircraft to the right to intercept it. On more
complex panels, this reverse behaviour is corrected for, and you will
see the normal cues as if you were flying a localizer approach on a
front course.
737 NG "complex" panel MCP

You will see
many of the same buttons, just rearranged somewhat. These mirror quite
accurately what you would see in a 737 NG aircraft. Here are the
important differences from the above simple panel.
LVL CHG
This is a mode that
will either climb or descend the aircraft, to the altitude you have set
as target. While changing altitude, the aircraft will fly the airspeed
or Mach speed that you have set in the MCP. It will accomplish this by
adjusting the pitch of the aircraft. This will protect you from ever
approaching a stall, and at the same time it will allow you to climb
as efficiently as possible given the thrust being used. This is only
available in complex panels, but can be simulated in a number of ways
with simple panels.
VNAV
VNAV mode
(vertical navigation) is essentially an intelligent LVL
CHG model, that will climb and descend an aircraft according to the
flightplan you have entered, and the altitude and speed restraints you
have placed for specific waypoints in that plan. It all happens
automatically. Unfortunately, sometimes VNAV is more mysterious than
the human mind can fathom. This function is only available in complex
panels.
LNAV
LNAV (lateral
navigation) is a fancy HEADING mode, that will
continually command the aircraft to follow the flightplan that you have
entered, taking into account the prevailing
winds. This also is only available in complex panels, but can be
nicely simulated with add-on products, including some very high quality
freeware add-ons, such as vasFMC discussed below.
BC (Back Course) is missing!
You may find that
there is no BC button. In this instance, the normal front course or
back course selection is sensed by the
aircraft by your position. All you do is enter the front course
direction regardless from which direction you will be approaching and
landing. For example, regardless if you were flying the ILS "front
course" approach with glideslope guidance (course 190), or the "back
course" (BC) with a localizer only (course 010), you would still enter
the front course direction, 190, as the course setting. This is
simulated correctly only in complex panels. Some
aircraft, like the 747-400, will not sense a BC approach at all,
because they would normally never use such an approach.
vasFMC - a
Freeware FMC
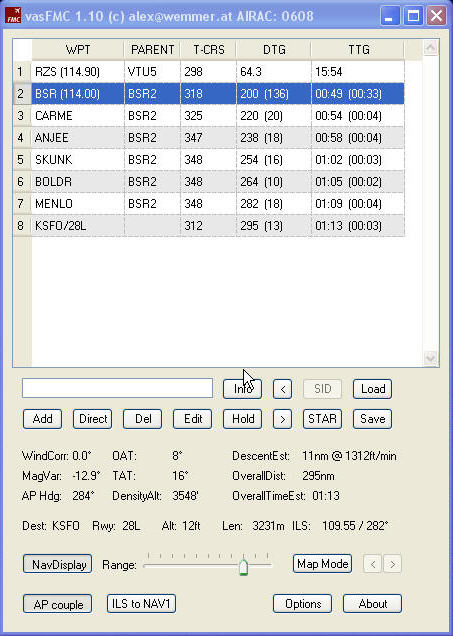
Wow, what an application! It
doesn't care if you're using FSX or FS9, it
works through FSUIPC, and works fine with WideFS. If
you are flying freeware -- RUN, don't
walk, and grab this one!
At right, the FMC "panel". I'm just taking off from KLAX, off to
KSFO. vasFMC comes with a separate Navigation Display (in Boeing or
AirBus type) with range control and
a map mode so you can check your flight plan. It even has a TCAS and
the
Boeing Banana for altitude prediction on the ND! This panel is a
representation of a LEGS page from
an FMC, that is where you do all the input/edit and control.
Although it doesn't have
full VNav (vertical) guidance, it does have a
descent calculator that shows you your Top of Descent, and this keeps
updating, so you know if you are on track. Even suggests a rate of
descent to use, and it shows the green
Boeing Banana
on the ND. This green semi-circle shows you at what distance you will
attain
the altitude set in your plane's panel MCP (autopilot), if your current
rate of descent or ascent is maintained. The combo makes planning for
altitude restrictions a snap!
This thing is amazing! Hard to believe that
it is
freeware.
|
The whole flight plan can be inserted in standard format text,
direct from Flightaware or Simroutes. FSBuild 2.3 (just released
version) will export to vasFMC now.
If you want to edit a
flightplan, the runways, SIDs and STARs are added
with
a click, and easily edited any number of times. Includes DIRects, easy
enroute changes, even flyover points and HOLDs! Even sets the ILS up in
your NAV1 radio with a single click.
Gives you all the pertinent altitude and temperature data, landing
field
altitude, even your current Density Altitude!
It even uses up-to-date
Airac/Procedures data. It uses the F1 ATR set, so it will continue to be
updated. Shipped with an old set, but
easy to update from NaviGraph if
you are using that, or grab the last
0608 free
data set for the F1 ATR.
AIRAC,
Procedures & Flight Simulator
AIRAC
AIRAC is
an acronym for
Aeronautical Information Regulation and Control, but when we use the
term we usually mean to refer to the complete database of waypoints,
navaids
and airways throughout the world. In our example route, COATE
(waypoint), FNT (navaid - VOR) and J36 (Jet airway) are included in the
AIRAC
database. The database is dynamic, and routes & waypoints
are
added and deleted.
Procedures
Procedures are defined by selected waypoints and navaids from the
AIRAC. Procedures include SIDs (eg.
KENNEDY1), that we use to leave an airport, and STARs (eg. SAYRS1) that
we use to approach an airport. These also are redefined and updated as
needs change.
Flight Simulator ATC is
completely SID/STAR-blind, and one
of
the many
reasons that you really shouldn't use it. The Flight Simulator flight
planner
is also not set
up to use STARs or SIDs directly, but at least you can input the
individual waypoints and set up the route.
Keeping up to
Date
There is one additional
stumbling block. The FS9 AIRAC (airway &
waypoint) database is stuck in 2002, so many of the current newly
defined
waypoints may not be in that older database. FSX is frozen at April
2006. When you encounter issues like that online, being asked to fly to
a waypoint that you just don't have, be sure to indicate "unable" and
request vectors instead from ATC.
If you have a pdf hardcopy
of a chart, and if the latitude/longitude of a waypoint that you don't
have is noted, then you could potentially input that, and then navigate
as directed. But, never pretend to be
able to comply when you can't! That will just compound the situation,
and it is completely
unnecessary, as ATC understands that not everyone has the latest
databases.
The good news is
that when you use vasFMC or a complex aircraft panel
that uses its own AIRAC
database, you can always be right up to date!
Previously the worldwide
database was available for free, but it has now changed to low-cost
payware from Navigraph.
That is unfortunate, but the alternative was losing access to the
database
altogether due to international licensing issues. The last freeware set
(Aug
'06) is available for download from AVSIM, and it is not that out
of date at present -- search for "AIRAC"
& "Richard Stephan" in
the navigation section.
The world-wide procedure
(SID/STAR) database may already be available through Navigraph
(payware)
for your aircraft, they are expanding availability to a wide variety of
aircraft sims.
There also are reasonable
freeware alternatives. Planepath
provides at no charge the SID/STAR database for the US, Canada &
some
of the UK for many aircraft panels, including vasFMC. Also users just
like you & me, have taken the trouble to program the various
procedures for a variety of aircraft themselves. This "third party" set
of procedures is available for free download at a subsection of
the Navdata
site.
Lots of choices. Together
with the pdf viewable/printable charts
for the procedures
world-wide, some sources for these were noted in Flight Planning, you have your maps
for the sky.
Navigation
VOR
(VHF Omni-directional Range)
This is the navigational aid (or NAVAID) you will
encounter the most. Think of the VOR as a radio antenna that sends a
distinct signal along each of its 360 radials. This allows a VOR radio
on
an aircraft to determine the direction to the station. By convention,
like bicycle spokes, radials are
always considered as
pointing
outwards from a VOR, but logically can be considered as extending out
on both sides of the VOR. One side being the FM (from) side, and the
"backside" of the radial being the TO direction. The course and the FM
& TO do not indicate your direction of flight (heading), but rather
where you are relative to the VOR.
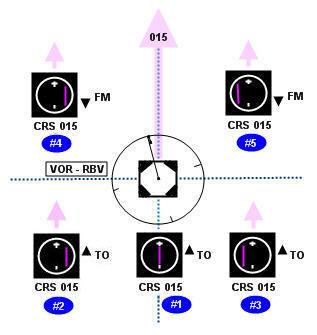
Now, look at the diagram at right, if you can memorize that diagram, or
refer to a printed copy, you will always know where you are relative to
a
VOR, and how to track towards or from it, and along any specific radial
if required.
There are five MFDs drawn in, as you might see them on your panel. They
are meant to represent what you
would see while in an aircraft in those relative positions. The
diagramed white line and magenta bar on each MFD together are called a
split cue CDI
(course deviation indicator). The light magenta arrows note that the
aircraft are all heading in a direction of 15° magnetic. The course
knob on
the MFD has been set to 015, because we are interested in the 015
radial. Also note, that the VOR (RBV) has a magnetic north
slightly to the west (left) of true north, although the diagram is not
exactly to
compass scale.
Now look at MFD #1. The split needle is aligned, that indicates that
you are on the VOR radial that is set as the course, namely 015. The
MFD arrow is
signifying a "TO" direction. Therefore you can continue your
heading of 15°, if you wish to fly directly to the VOR along the
"backside" of the RBV 015 radial. You are actually flying along the RBV
195 radial. Ok,
that's not too hard.
Now look at MFD #2. Everything is set the same, but the split needle is
now to the right. To intercept the
radial, we need to turn
to a compass heading somewhere on the side of the magenta needle
deviation, which here is between 015° and 195°. Because
in our examples we are flying the same heading as the course we have
set, here we would just need to turn to the right. You would
intercept it quickest, if you turned 90° right, fully in the
direction of the magenta CDI, to a heading of
105°, although that might not be practical. MFD #3 is exactly
the opposite, you need to turn left.
Now consider MFD #4. The split needle is to the right, so you need to
turn right to intercept the 015 radial you have set as the course. But
here that radial is "FM" (from) the VOR. If you intercept that
radial,
and continue on a heading of 015, you will fly away from VOR RBV. MFD
#5 is the opposite to #4, you need to turn left to intercept radial 015
from the VOR.
Now, if you just want to fly directly towards a VOR, not necessarily
along a specific radial, just turn the course knob until the split cue
needle lines up, and ensure you have a TO indication, note the course,
and then just fly
that as the heading. If you have a FM indication, you will fly directly
away
from the
VOR if you make that course, your heading. Turning the needle 180°
will always switch the FM to TO, or vice versa.
The easiest way to get a better understanding of all this, is to load
up an aircraft in Flight Simulator, place it somewhere relative to a
VOR, and then rotate and slew
around! You will have a working model you can observe. Play with
the aircraft heading and the MFD course setting in various positions.
It will all start to make sense!
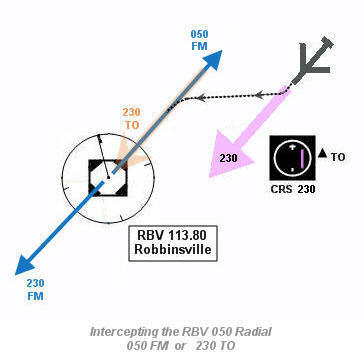
Now, let's look at an example, it is a little tricky. Let’s say you are
going to fly to the RBV VOR
(Robbinsville) which is located southwest of NYC. You need to look up
the frequency, it is 113.80.
You are flying from Boston, are heading southwest,
and
decide to pick up and track along the 050 radial towards RBV. But
remember radials always point out, so that would be along radial 050 in
a FM (from) direction! It is always easier to think of a TO
orientation, so instead think of the 230 radial (from the opposite
side) extended backwards.
Set your MFD course to 230, ensure you have a TO
direction indicated, you will turn right so as to center the MFD
needle. When centered, you then turn to a heading of 230 and you will
be flying along
the 050 radial directly towards the VOR. (figure right) This corresponds in
relative position to the VOR, with MFD #2 above.
That's
the theory, now you are in an aircraft. NAV1 frequency must be tuned
to
113.80. As in the above exercise, the
course
is set to 230, because that is now your new desired radial. As in the
schematic at right, you will see
in the
MFD (figure below) that you
have a line pointing to heading 230 and a magenta bar to
the
right
of it. With the magenta needle to
the
right, examining the compass markings, it shows you need to fly a
heading between 230º and 50º to intercept. As you are
travelling on a heading of 230º, you will need to turn right to
intercept that radial. You
can now choose if you want to fly to RBV by hand, or if you want George
to do the work.
Flying it by hand
requires a bit of timing and judgement. First
you need to turn to the right, say Heading 250. Then once
you see that the magenta bar starts to move to the left and closer to
the
center line, start turning left until you reach the desired course of
230. If the
line is now to the left of the centre line, you have overshot the
radial and you have to correct it by turning in the opposite direction,
until the split cue CDI becomes one straight line. As you get closer to
station, the CDI will become more responsive, when you are very close
it may jump around as if possessed.
To have the autopilot fly you onto the 050 radial
(230 course towards the VOR), again you must first be on an
interception
course for the radial, say Heading 250, then simply press the NAV
button on the autopilot
and wait. Once you get closer to interception, the autopilot will
start turning the aircraft and eventually you will be flying on heading
230 directly towards
RBV.
Don't forget that, if you set the MCP up as if you
were going to have the autopilot fly it -- but don't turn the A/P on --
the Flight Director will still show you the course to steer to complete
that task. This is exactly the course that the A/P would have steered.
Don't
forget to use that FD cue whenever you can, when the A/P is off.
DME (Distance Measuring Equipment)
Many VOR and ILS stations include a DME signal.
This is
a separate device which transmits pulsed signals that allow a DME
receiver in the aircraft to determine the distance to the station. DME
is an important navigational tool.
An example is on our planned departure. After take
off, you
are required to make a turn to the left when you are about 4 miles
from
the runway. On a chart this will be printed as 4 DME. You accomplish
this by tuning in the station that the chart references for the
distance. As you move further from the airport, the displayed DME will
increase. As it appraoches 4, then you need to perform the turn.
Another example is with a VOR (assuming it is also
equipped with a DME), where pilots are required to turn at 10 DME away
from the
VOR to follow a flightplan onto a new Jetway. As
you get
closer to the VOR, the DME will decrease and as it approaches 10 DME,
you execute the turn.
More Navigation Stuff
There is no end of materials on Aviation
Navigation, but there is one website resource that really stands out for
the virtual pilot, and that is:
Flight Simulator
Navigation
This is a comphrehensive, yet easy to follow, and entertaing
read. It covers everything, including the history. It even has an
optional
tutorial approach included together with a custom aircraft and panel to
ease you through the lessons. It is nicely indexed, and you can quickly
click to just the sections
that
you wish to read, or you can read through the whole thing.
Bookmark it! You will likely return, and review it
often.
METAR
(Aviation Routine Weather Reports)
METAR’s are aviation's version of weather status.
A TAF is an aviation weather forecast. The FAA and different weather
services created
a shorthand specification for stating weather conditions that would
standardize reports across the world. This system was launched in July
1996.
You can find the reference website here:
METAR/TAF
- NOAA Satellite and Information Service
You can obtain a current METAR in a variety of
places, including online on VATSIM and with ServInfo, described in
the VATSIM section. Here are two websites where you can obtain
worldwide
METARs:
NOAA
Aviation Weather
METAR Data Access
Here is a site prepared by an individual, listing
many of the more common METAR terms and their intrepretation:
METAR decoding
Let’s look at some example METAR’s and decode
them.
KMIA 151353Z 30008KT 10SM FEW250 16/12 A3009
RMK AO2 SLP189 T01560117
KMIA – this represents the METAR reporting facility
151353Z – the first two numbers represents the day
of the month, in this case the 15th, the next four numbers are the time
of day in Zulu or GMT.
30008KT – this is the current wind. The first
three numbers are the wind direction, here the winds are blowing from a
heading
of 300, the wind heading specified here is always the TRUE heading, not
magnetic. The next two numbers are the wind speed, and in this case it
is 8
knots.
10SM – here, we have the current visibility. When
you see it like this, 10SM, you could expect the visibility to be 10
statute miles or greater, 10 statute miles is the maximum visibility
distance reported.
FEW250 – this is the clouds over the facility.
Here we have a layer of FEW clouds at 25,000ft above the ground. The
cloud layer level is always stated as the height above the ground, not
the height above sea level.
16/12 – this is the temperature/dew point in
°C. In this case the temperature is 16°C and the dew point is
12°C.
A3009 – This represents the local altimeter. Here,
the altimeter is 30.09 in Hg.
RMK – Anything after this is the remarks section.
The remarks can be quite varied.
SLP189 - Sea Level pressure reported in tens,
units, and tenths of hPa
KJFK 151351Z 36017G25KT 1 1/2SM -SN BLSN FEW008
BKN017 OVC026 M13/M14 A2985 RMK AO2 PK WND 35026/1325 SLP108 SNINCR 1/6
P0001 T11281144
Here we have another METAR; let’s go over what is
different.
36017G25KT – this is still the wind, but now the
wind has gusts. The readout would be, winds from 360 at 17 knots
gusting at 25 knots
1 1/2SM – Now the visibility has decreased to
about 1.5 statute miles. A nautical mile is about 6000 ft, so about 15%
longer than a common or statute mile.
-SN BLSN – whenever we have an event like rain
(RN) or
snow (SN), this will appear in this section. Here we have Light
Snow(-SN) and Blowing Snow (BLSN).
Just SN means moderate snow, and +SN means heavy snow. We like that!
FEW008 BKN017 OVC026 – Now we have more cloud
layers above us. This reports a layer of Few clouds at 800ft, a layer
of Broken clouds at 1,700ft (this is also the ceiling) and an Overcast
at 2,600ft. The reported ceiling will be at clouds broken (5/8-7/8) or
greater. SKC=sky clear, FEW=0/8 to 2/8 sky coverage, SCT=3/8 to 4/8,
BKN=5/8 to 7/8k OVC=overcast. The cloud levels are always
reported in hundreds of feet above the ground (AGL), not above sea
level.
M13/M14 – now the temperature and dew point have
an M in from of them. This represents the Minus symbol. Here we have a
temperature of -13°C and a dew point of -14°C.
A2985 – this is the local altimeter, now at 29.85.
ENGM 151350Z VRB02KT 4000S VCSH BR FEW005
BKN006
M04/M05 Q1018 TEMPO 9999 SCT006 BKN011
This is a METAR from Europe, and as you can see,
it is somewhat different from the US & Canada.
VRB02KT – this is something you will see in the US
too. The winds are Variable at 2 knots. This means that the wind is
shifting so much that a fixed heading can’t be set.
4000S – this is the visibility, though a little
different. The visibility is reported to be 4000 meters or 4km when you
look to the South.
VCSH – this is an event, here it says: In the
vicinity, rain showers.
BR – mist (from French, just think "baby rain");
FG = FOG, which is just
dense mist, with visibility <1000m
Q1018 – as you might know, in Europe they use QNH
as the altimeter. Here the QNH is 1018 hectopascals (hPa), 30.08 in
Hg
TEMPO – this is the remarks section, it means
TEMPOrary.
If there are
no remarks you will see NOSIG instead.
|