Primer
Home
Flight Planning
VATSIM
Get
Connected!
Departure
Navigation
Arrival
ILS
Approach
Visual Approach
Pattern Practice!
UVA Main Page
Flt
Stds & Training
|
The ILS
Approach
Landings are the most demanding part of the
flight, and we are going to look at the two most common ways of
performing them. Most of the time when flying for UVA you will be using
precision
approach runways, these are runways with an ILS approach available.
These can be flown with an instrument approach or visually. In this
class we cover the instrument approach.
Non-precision approach runways are found at
smaller airports, or on less used runways at large airports. These
include
VOR, VOR/DME, NDB and GPS approaches. Non-precision approaches require
higher minimums, and can be put out of use sooner when inclement
weather occurs. We will not specifically cover non-precision approaches
in
these lessons.
In this class we will teach you about:
- What info is necessary before the approach
- Setting up the navigation equipment
- Flying it with the autopilot
- Flying it by hand
- The “touchdown” part
Necessary
Information
Before you can fly an ILS approach, there are a
few things you will need to know:
- What runway you are going to land on
- The ILS frequency
- The approach course (exact runway heading)
- The weather, and the approach minimums
Lastly, there are approach charts for most
runways.
These give a detailed explanation on how to approach the runway. Charts
make things much
more realistic, and safe!
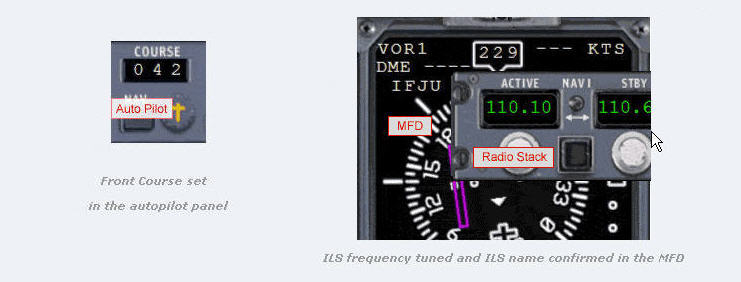
As an example, in this class we will be using O’Hare’s
runway 04R, which has an ILS frequency of 110.10 and an
approach course of 042°. A portion of this plate is shown below,
but download the full chart, and follow along.
Setting up
the navigational equipment
The two instruments we use when we are setting up
for an ILS approach are the NAV1 frequency and the course knob. NAV1 is
set in the radio stack (the button with a radio antenna).
Using the example above, we should tune the NAV1
frequency to 110.10 and set the course knob so it reads 042. Note that
the magnetic course for a runway can change slowly, as the magnetic
north pole wanders. This is quite predicatable over the short term.
Now we need
to make sure we are on the correct ILS, this is critical. There are two
ways of doing
this. We can either check the localizer name in the MFD or go to NAV1
and press ID (on the default 737 it is the gray/green button on
the top or bottom labled NAV1). You will then hear the Morse Code
identifier for
the station. If it matches what is printed on the chart (right
below the frequency), you have tuned to the correct localizer
frequency. There are no points for landing at the wrong airport, or
flying into a mountain. Be sure of what you have tuned!
Flying it
with the autopilot
Flying an ILS with the autopilot can be done in
different ways. During vectoring to final, ATC will say; “Turn left to
heading 070º, descend and maintain 2200. You are 8 miles from the
Outer
Marker. Maintain 2200 until established on the localizer, cleared for
the ILS 04R approach.” This indicates that you have been given your
final
vector and that you are now cleared for the approach procedure.
At
that point you should set the heading to 070º, and then press the
NAV
button. As you near the the localizer, you will see that the HDG
indicator will extinguish, and the plane will turn to line up with the
localizer.
Once you are established on the localizer, you can
press the APR button, and the aircraft will capture the glideslope and
descend. As it does, the ALT indicator will extinguish. Be certain
that you are below the glideslope (have the magenta indicator above
you) when
you
press APR, else you will never intercept the glideslope. It is also
generally incorrect to intercept from above.
Engaging the auto-pilot and flying the glideslope/localizer is
NOT in itself an autoland, that is a coupled approach,
and can only be used to a DH (decision height, 200ft for Cat I
typically) on a non-autoland approach. Before the DH,
if you become visual (you can see the runway or the runway lights), the
autopilot is disengaged and the pilot lands
the plane, if not you must go-around. If you do not disengage the
autopilot
on a coupled apporach you will simply crash into the ground.
An autoland is generally only available in a high quality payware
plane, so that restricts its use significantly. Further, autolands are
rare in 737s and 757s, given the nature of the routes they fly.
Autolands are generally the privy of the Baby and full size Jumbos.
Flying it
by hand
Hand flying any approach can be a challenge, and
the ILS approach can be both easy and difficult to hand fly at the same
time. It’s easy because you will have full guidance from your
navigation equipment, but it can be difficult because it requires more
precision than any other approach. This is a classic “practice makes
perfect” procedure.
The preparation is the same as with the autopilot,
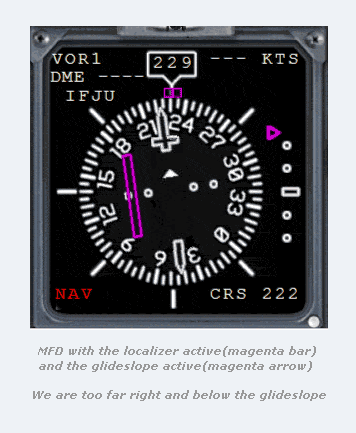
you tune up the localizer and set the course knob. As you make contact
with the localizer signal, you will see that the magenta centre bar
(same
as with VOR navigation) and the scale bar with an arrow on the right
side lights up. These are the two most important tools for an ILS
approach.
The magenta centre bar works just like as it does
when navigating VORs. If the bar is to the right of the centre,
you need to be more to the right. If it is to the left of the centre,
you need to be more to the left. It indicates where the
localizer course is.
The scale bar with an arrow is used to indicate
the glideslope. It works the same way as the magenta bar, just that it
is
the arrow that indicates whether you are too high or too low. If the
arrow is above the middle of the scale, you are too low. If it is below
the middle, you are too high.
Above 1000ft on an ILS approach (500ft on a
visual), you should target being within one dot of center on both
localizer and glideslope, and never exceed two dots. If you do, then
you don't know where you are, and you must go around.
Below 1000ft (500ft on a visual), it is contrary
to FAR to go below the glideslope.
The position you are relative to the localizer and
glideslope track is important, but it is even more important for you to
immediately make a correction to recenter when you stray left or right,
or up or down. The winds may blow you around, but you need to get back
where you should be quickly.
Below 1000ft (500ft on a visual), you must not
exceed -1000fpm in your descent, and you will typically be descending
at -750fpm.
If you violate any of these parameters, then you
must
go-around.
On approach in a small
prop piston plane it
is correct technique to pitch for
speed, trim to hold it, and then adjust your VS with the throttle
power.
The principles
are the same --
in every aircraft the elevator remains
your speed control and your throttle your up/down control. But for an approach in
a turbine, small or large,
jet or prop, the
above technique will not work very well.
The problem is the spin up/down
time of the fast rotating turbines. There is too much of a delay
between when you apply the power adjustment and the effect.
|
In a Turbine, once properly
trimmed for the descent, you make small
adjustments to your vertical speed by nudging the yoke forward or
backwards.
If you have an A/T
active, the engines will then spin up or down, and make the correction
in
engine power for you. If you don't have an A/T, then you need to gently
cut back on
the power, or slightly increase it manually.
For example, let us say
that you are in a fairly stable approach,
but drift a little high. You push the yoke forward a bit and then
release,
and cut back on the throttle just slightly, or the A/T will do it for
you
because it notes a slightly higher speed. The elevator adjustment will
get you back on vertical course, and by the time you are, the engines
will have spooled down a bit, and will keep you there! If you
are a little low, well of course you do the reverse.
To remain
on horizontal track for the localizer, you do the same type of thing,
but by rotating the yoke. Gentle, short, banks left or
right, never more than 5º, usually
less.
The
key for both, is timely and
smooth corrections. Be very careful not to overcorrect. Be incisive,
but patient.
Respecting these
principles will result in a
stable
approach, and that is really a good thing!
The
"touchdown" part
Every flight ends the same way. You touch down,
brake and then clear the runway. A good landing is almost always
preceeded by
a good approach. The full SOP for the approach is discussed elsewhere,
but here are the highlights.
For this approach, the FAF (final approach fix)
for runway 4R at KORD is REKKS
intersection, and this is shown to be 6 DME from the midfield VOR -
ORD. It is co-incident with an active Outer Maker (OM), that is the
pinched shaded oval. You should have
the ORD VOR tuned (113.90) on NAV2 to confirm when you are at the FAF,
together with having the Marker Tone audible for a further
confirmation. You must be certain that you are at the correct location
before you descend further.
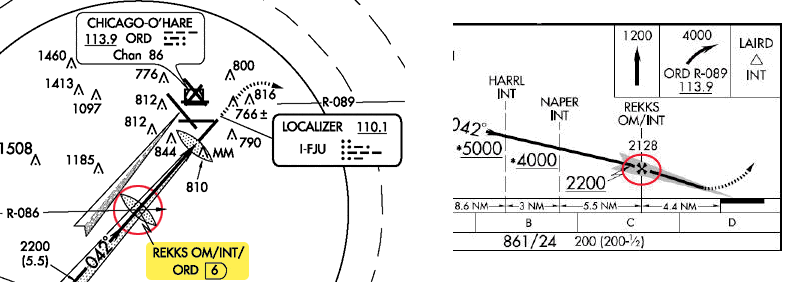
The
red
circles indicate the position of the FAF and the Outer Marker
- At the FAF you need to be all hanging (landing
flaps & gear down), at the wind corrected Vref (Vtgt) speed, the
FPD will calculate all this for you!. You should be no
lower than the altitude listed on the plate for the FAF, which here is
2128ft ASL. Even if ATC requests
that you fly 170 knts "to the marker", you should still have your gear
and flaps extended. As you reach the FAF, you can quickly slow down to
your planned landing airspeed.
- Once at 200ft AGL on a
non-autoland approach, you will be relying on your Mark I eyeballs,
although of
course using the instruments for confirmatory backup. Be very wary of
elevator overcorrections at this point. In continuing to attempt to fly
the
instrument
glideslope, you could convert a so-so situation into a disaster. For
example you might see that you are a little high, so you push the nose
down. But you run it up to -1200 fpm descent, can't recover, and then
it is the A&P folks that finish the flight. Much better would have
been to just hold your descent at the -750 fpm that you were going, and
land just a little long, but still comfortably in the Landing Zone.
Remember you
have a 2000ft long target.
- You should cross the threshold at Vtgt, at
about 50ft. No lower than 40ft, and no higher than 90ft. You should now
switch your gaze to about 3/4rds of the way down the visible runway.
The rest of the maneuver is heads up.
- As you cross the threshold at 50ft you should
start to retard the throttle, the reduction should be gradual, you want
to just idle throttle
as you touchdown.
- At 20ft to 40ft AGL (the larger the plane, the
sooner you need to flare) you should start a gentle pull back on the
yoke to create a flare. Increase the pitch attitude no more than
2°.
You will now literally fly the aircraft into the ground at a gentle
-150 fpm or so. You should be at Vref on touchdown, never less than
Vref-10 knts. Never, ever stall, or approach a stall with a jet
aircraft, in the way you might land a small GA prop plane. Landing
at more than -500 fpm will mandate a very expensive visit to the shop
for maintenance.
Do not strive for that greaser of a landing
at
-10 fpm, at the penalty of floating halfway down the runway. You may
kiss the runway, but it may be the kiss of death. A firm landing is
sometimes even desired, in adverse weather conditions. But you must
always land in the UVA SOP landing zone.
UVA SOP also define the landing flaps to use for
every plane we fly, and the Flight
Planner (FPD) tool lists this, as well as calculates the Vref
speeds you need. The FPD docs have a good discussion of VSpeeds, and
what they all mean. Similar functionality is available in the dispatch
release, optionally created when you book a flight.
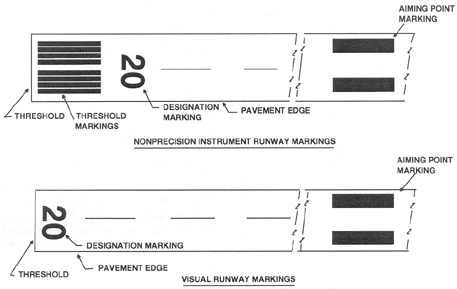
There are two kinds of runways that you will land
on with a commercial aircraft. The precision runway (a runway with ILS)
and the non-precision runway. They have different markings, but the
principles are the same.
UVA SOP defines where you must land. Your main
gear (not the nose gear) must touchdown first, and must touchdown in
the 2000t long area marked in the diagram below with the two green
stripes. Your visual aiming
point
should be
the two large white solid rectangles circled in magenta.

The above markings are for
a precision approach runway.
The yellow chevrons (X) indicate no plane traffic allowed at all,
neither landing nor takeoff nor taxi. Your gear may poke through the
runway!
Next, the sequential white arrows and then the three white arrows
aligned in a row (area M), are pointing to the threshold and mark off
an area. You may takeoff from, or taxi through this area, but you must
not land in this area. It may not be stressed to take the impact of a
normal landing.
For purposes of the checkrides, landing in area (X) or (M), or missing
the runway altogether, is a
catastrophic error.
The threshold (T) is marked with a solid right to left line, and
usually lit up in green at night. The runway will take the full weight
of a landing plane at the threshold and beyond. The piano keys (P)
immediately follow the runway threshold, they indicate the width of the
runway, here the runway is shown as 200ft wide. The runway
identification number (N) immediately follows this. The next marking
(E) is for orientation, it is 500ft after the threshold (T), and 500ft
before the start of the landing zone (A).
The solid white rectangle pair (A), is your visual aim point for
the landing. The point at which a jet should land is defined
differently from airline to airline, there are a number of competing
considerations. When flying for UVA, and in particular on our
checkrides, the earliest point where your gear can touchdown, is 1000ft
along the runway from the threshold at the visual aim point (A), and
the latest point is (B), 2000ft from the visual aim point, and 3000ft
from the threshold.
This legal landing area is shown as (L). Landing outside of this area
is a critical error for purposes of the checkride. The other four sets
of marks in the landing zone are all 500 ft apart, and are for
orientation.
For normal ops, if
you can't safely land in
the landing zone (L) between the solid rectangles (A) and the last
single stripe pair (B), you must go-around. This is UVA SOP.
On a non-precision runway, you
also aim for the white solid marks, and you should touchdown somewhere
in
the first 1/3rd of the runway.
Non-Precision
runway
This is another “practice makes perfect”
procedure. As the outcome of every flight depends on it, it should
become a comfortable routine as you get more practice.
|