Departure
& Take Off
We
will use the flight that we planned earlier, from JFK in New York to
Chicago
O’Hare as an example. Many of the illustrations here will be from the
default FS2004 B737 cockpit, some are taken from the PMDG 737 NG
cockpit. Other cockpits can and
will look different.
Now
it's time for you to learn the first part of every flight, the
departure.
In
this class we will teach you about:
- Gate
ops and push-back
- ATIS
- The
different aspects of taxiing
- Sequencing,
Hold short and Position and hold
- The
take off, departure and SIDs
You
can obtain US departure and arrival charts at no cost, at myairplane.com and airnav.com. Charts for many countries
are available from chartfinder.vatsim.net.
Here
are the two
pages for the KJFK Kennedy 1 departure procedure (SID):
KENNEDY
ONE, page 1
KENNEDY
ONE, page 2
Note that these procedures update continually, and the actual url links
may
change and outdate.
Clearance
It’s a beautiful Monday morning and dispatch has
given you your next assignment. You are going to fly a 737-500 from
John F. Kennedy Intl (KJFK) to Chicago O’Hare Intl (KORD). Fuel and
routing (discussed in a previous class) are taken care of and
the plane is ready to go at the ramp.
You tune in Kennedy Clearance on 135.05 on the Com
radio and say: “Kennedy Clearance, United 123 requesting IFR clearance
to O’Hare”.
Clearance will respond in two ways, depending on
how busy the controller is.
“Clearance on request, Stand by”
This means that the controller is busy or that you
might need to wait a bit. Do not answer, do not say anything further,
just wait.
Or with an immediate response with the clearance:
“Cleared to O’Hare via KENNEDY1 departure,
Canarsie climb, radar vectors to COATE then as filed, expect FL320 10
minutes after departure, departure frequency is 135.900, squawk 1501”
Departure procedure names and versions can change
from time to time, these are current as of this writing.
The clearance tells you that you are cleared to
O’Hare, that you will be using the Kennedy1 departure, you are assigned
the Canarsie climb (further explained below), you will get radar
vectors to waypoint COATE, and in case you lose radio contact with the
controller you are cleared to FL320 10 minutes after you depart. Your
departure controller will be on 135.90 and you are assigned
squawk/transponder code 1501.
Here, the departure procedure (Kennedy1, Canarsie
climb) includes your initial cleared altitude, which is 5000ft, this is
shown on the Kennedy1 departure plate. More often in the US the initial
cleared altitude is not included on the departure plate, and ATC will
specify it as part of the clearance.
You may do a full readback, like so:
“Cleared to O’Hare, Kennedy1 departure, Canarsie
climb, radar vectors to COATE then as filed, expect FL320 10 minutes
after departure, departure frequency 135.90, squawk 1501”
A full readback is not required. You must
readback the intial
cleared altitude (or the departure procedure if the altitude is
included) and the squawk code:
“Cleared IFR O’Hare, Canarsie climb, squawk 1501”
On a different flight, where the initial altitude
is specified
explictly, you must read it back, for example a flight from O'Hare to
San Francisco:
"Cleared IFR San Francisco, five thousand initial,
squawk 1734"
But, that is not
today!
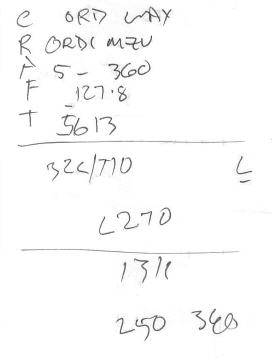
One handy tip to help you copy a clearance, is: "C-R-A-F-T"
You can simply write it vertically as depicted to the right, and then
be ready to copy the clearance. US clearances are always
given in that order for standardization.
To the right, you can see some scribblings, along
these lines, but not for this flight.
C –
ORD - LAX (Clearance)
R – ORD1 to MZV, then as filed (Route)
A –
5,000ft, then FL360 (in 10) (Altitude)
F –
127.80 (departure Frequency)
T –
5613 (Transponder
code)
Below that you can see noted the expected runway
(32L at intersection T10), and the ATIS code "L".
It is generally a good idea to write down ATC's
instructions, to ensure that you don't confuse them. That is always
possible in
the busy and hectic departure or approach airspace, when you often need
to do more than one thing at once.
Below that is noted the next instruction radioed
by ATC, to turn Left to a heading of 270°. And then climb to 13,000
ft, and a turn to heading
250° "on course" and finally up to FL360. Yes, that is my sloppy
writing,
but
I'm handflying a plane too!
Outside of the US you will find
that
the clearance items included and their order will vary somewhat from
country to
country. The readback requirements may differ as well. If not sure, do
a
complete readback.
ATIS
You read back the clearance and Clearance gives
you his last word: “Read back correct, ATIS is Alpha, contact
Kennedy Ground on 121.90”
The ATIS is short for Automated Terminal
Information Service and is the airport's current information
with regard to weather and runways in use, as well as miscellaneous
advisories. On VATSIM the ATIS is
automatically sent when you tune into a controller. Recently voice mode
ATIS has also been introduced on VATSIM, for this you tune a separate
ATIS frequency, like in the RW. This will match the ATIS frequency
noted in the charts! You must have the ATIS before you contact ground,
and
it is a good idea to get it before you contact clearance.
At your destination, if an ATIS is available, you
should get it. On first contact with the Terminal Airspace
controllers, besides announcing your altitude, indicate the ATIS you
have.
A example ATIS would be:
“Kennedy information Alpha, winds 320 at 15,
visibility 10 miles, ceiling Broken at 15000 feet, Temperature 5°C,
Dew point 1°C, altimeter 29.75. Runway 31L is used for departure,
31L/R for arrival This is Kennedy information Alpha, advise on initial
contact you have information Alpha.”
ATIS reports are identified by alphanumeric codes
(Alpha through Zulu). When a new ATIS is published, the code goes up by
one letter. Telling a controller you have information "Alpha" lets him
know what you copied and (if it has changed since you checked) he can
give you the latest data.
Although winds are generally reported in true
degrees and knots for weather reports, and also in aviation METARs,
this is not the case in the ATIS or the reports from the Tower. To
match all
the other directions in aviation at lower
latitudes, the winds in the ATIS are stated as relative to magnetic
north. The direction is where the
wind is blowing from. Visibility is self-explanatory. The ceiling is
the lowest cloud layer that is either broken or solid. Temperature and
Dew point are self-explanatory. The altimeter is the local barometric
pressure corrected to sea level. In North America it is reported in
inches
of mercury (29.92 is standard), in most of the rest of the world it's
reported in hectoPascals (something like 1006) and labeled "QNH".
Active runways allow you to plan for your arrival
or departure.
The weather information is extracted by the controller from the field's
latest METAR. METARs are weather reports generated every hour (or more
frequently in rapidly changing weather conditions) by an airfield
approved observer, these will be explained in the next class. Some ATIS
reports are automated.
Now, in the real world, you would contact the ramp
manager and get pushed back by a little truck. But since we are not in
the real world, we just use the push-back command in Flight Simulator.
Some
controllers will clear you to push back and start engines at your
discretion when giving you a clearance. Others will want you to get
specific permission as you may be pushing back into an active taxiway.
In Europe it is common to get clearance for startup when at the gate.
This does not mean to start the engines, it means to get the plane
ready for pushback. You should not start your engines until you are
clear of the gate, and at the very least not until you are in pushback.
Taxi
Engines are started during pushback. Departure
flaps vary from plane to plane and
sometimes flight to flight. UVA has established SOP for flaps to be
used for all its aircraft, and these are noted in the Dispatch Reports.
Takeoff flaps should be set at the first point of
movement under your own power.
When you are ready to
taxi, contact ground on 121.90 and say:
“Kennedy Ground, United 123 holding short of
taxiway Alpha, ready for taxi for departure, with information Alpha”
It's important to tell the controller where you
are and where you want to go in an initial call-up. Ground can respond
with different instructions. So let’s take a look at them all in order
to make sure we always understand what Ground wants us to do.
“United 123, taxi to runway 31L via RIGHT on Bravo
then Zulu”
This is pretty straight forward; he wants you to
taxi to the departure end of runway 31L, making a right turn onto Bravo
then using the Zulu taxiway.
“United 123, taxi to runway 31L via RIGHT on Bravo
then Zulu, give way for and follow the American Boeing 737 coming from
your left to right on Bravo”
Now, here’s something to think about. He now wants
you to follow another plane. So, you taxi the same way, just make
sure that you are behind the other plane. When you get to Bravo taxiway
and are ready to make your right turn onto it, you should be looking to
your left for that American 737 to pass ahead of you then you'll fall
in behind it.
“United 123, taxi to runway 31L at KA intersection
via RIGHT on Bravo”
Here we got instructions to depart from runway
31L, not at the full length departure intersection but rather
intersection KA which is somewhere before the end of the runway. It is
important to remember that at maximum load you may need the entire
runway length available to take off and (under all circumstances) as
pilot in command
you have the right and authority to request a full runway length
takeoff – you just may have a long taxi and wait for departure,
intersection departures are frequently used to expedite traffic flow.
“United 123, runway 31L, taxi via RIGHT on Bravo,
then hold short of Hotel, then give way for and follow the United 767
to the runway via Hotel and Zulu.”
Now, this is a tricky one. What he wants
us to do is taxi up Bravo to taxiway Hotel, and then follow the United
to the runway via Hotel and Zulu.
If on takeoff you were also following that 767,
you would hear "Caution wake turbulence." Because the 767 is a
heavy, the
controller issues a wake turbulence warning to remind you not to follow
the jet too closely to avoid being caught in the wake turbulence. Wake
turbulence exists only when a wing is generating lift, and gradually
drops down to the ground behind it, as the aircraft flies.
There are longer and more complex taxi instructiions, but I
doubt you will encounter them on VATSIM. The reason for “follow”
instructions is to sequence departures, which is a puzzle of
airplanes that Ground tries to fix so the Departure controller won’t be
too stressed.
Remember to hold the standard taxi speed of 20kts,
and
no more than 10 knts on 90° turns, else you will make our A&P
fellows
(mechanics) grumpy and cost us money! On landing, you may safely exit
onto
high speed taxiways at 40 knts.
Hold short,
position and hold
Once Ground doesn’t have anything more to say to
us, he gives us the hand off, “United 123, contact Tower 119.10
holding
short.”
This handoff can come at any time in the taxi
process -- we don’t even need to be at the runway entrance yet, but you
will always be handed off to tower before taking the active runway as
Tower "owns" it. This call tells us that we are to contact Tower when
we
arrive at the entrance to the runway, but that we are to hold short.
Sometimes ground will hand you off in a different
way, by saying, "United 123, monitor Tower 119.10." This will be while
you are still taxing. As directed, you change frequency, but just
"monitor", you do not need to announce yourself during the taxi.
When you hold short, you taxi up to the double
line across the taxiway that marks
the taxiway/runway boundary, and then stop. That line is called the
Hold Short line
and you cannot cross it without Tower's permission. After landing, you
also don't contact ground until you are
clear of the runway, meaning your tail no longer crosses that line.
Now, at
the hold short line, you contact the Tower.
You dial in 119.10 to contact tower, “Kennedy
Tower,
United
123 is holding short of runway 31L.”
Again, he can respond in different
ways.
“United 123, Kennedy Tower, Runway 31L, Position
and hold”
If there is a lot of traffic, you will encounter
this. What he wants you to do is get on the runway in takeoff position,
but don’t take off. In all likelihood someone else is still on the
runway, or another aircraft just took off or is on short approach. He
can't give you a
takeoff clearance until the runway is clear and there is sufficient
space in trail from the last aircraft. That is why it is so
important to get across that "hold short" line after landing – until
you do so, Tower can't clear other traffic to take off. Have your hand
on the throttles though, because when that take off clearance comes,
Tower expects you to start rolling immediately. You may also hear "Line
Up and Wait", this is just the non-US version of Position and Hold.
“United 123, Kennedy Tower, Canarsie climb, winds
320 at 15, runway 31L, cleared for take off”
This is the basic take off clearance if you are on
a DP (departure procedure). He reminds you that you are on the Canarsie
climb, what the winds are and clears you for take off.
“United 123, Kennedy Tower, Fly heading 220, winds
320 at 15, runway 31L, cleared for take off”
This is a little different, what it tells you is
that once you have cleared the runway, you
should start turning towards heading 220. If not otherwise specificed,
this is understood to mean at 400ft AGL, but some departures will call
for
a turn even earlier. The rest is the same. Either way, you're expected
to comply with the clearance you were given by Clearance Delivery.
Take off
Ok, you are cleared for takeoff!
Set your Transponder to squawk Charlie (altitude),
landing lights and strobes on, and now take the runway and center your
aircraft if you were not in position and hold. At a full stop with your
toe brakes, spool the engines
up to 70% N1 to check for proper and symmetric operation (called the
runup), then set to
takeoff thrust and you are rolling.
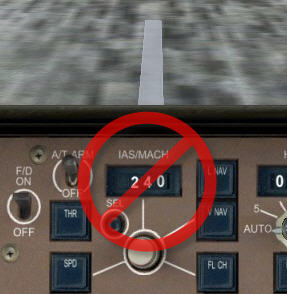
Now, we are going to talk a bit about those mysterious VSpeeds,
calculation of these is just a few clicks away, use
the UVA
Flight Planning Tool (FPD). There is also an explanation of
VSpeeds, and a more lengthy discussion of landing
and takeoff techniques, in the FPD
docs.
The UVA SOP takeoff profile is as follows. With V2 speed set in the speed window (but do not use SPD mode), and with
TOGA (takeoff/go-around) mode engaged, you accelerate down the
runway. At Vr speed you rotate (by a deliberate pull back on the
yoke) to a pitch of 8° over
about 3 sec, and your aircraft will take off. Continue the pitch
up to no more than 15° (17.5° absolute max) to hold V2+10 to
V2+25 knts, but if you miss the target, do not decelerate. On positive
rate (1000fpm),
seconds after liftoff, command gear up. Maintain the takeoff
thrust and target speed up to 1000ft
AGL, which is UVA SOP Acceleration height. You are holding the airspeed
of the
aircraft by adjusting pitch. Change to climb thrust at
acceleration height, pitch your nose down to
accelerate to 250 knts, and retract the flaps gradually as you pass the
minimum speed for each flap setting.
DO NOT just
blindly set a VS setting or SPD mode for takeoff or climb. If
you do not have a panel that lets you use a LVL CHG type function,
there are a variety of ways to simulate this with simple panels, both
while
hand flying or with the automatics. As always you will find abundant
information in the Training sections of the forums. Find some quick
notes on this, below.
For checkrides you must fly
with the A/P off (A/T is allowed), up to
and down from specified altitudes. When flying on your own, it is up to
you. You should always set up as if you were flying on A/P, and then
you can follow the Flight Director bars. It would be rare for RW pilots
to fly with "raw" data unassisted by the FD. I personally
always fly up to FL180, and down from 10k --it's fun.
Once you are ready to switch on the A/P ...
For lateral navigation in a
simple panel, you need to use HDG HLD
"manually" or in combination with any non-panel A/P that relies on HDG
HLD like FSNav or a freeware FMC, like vasFMC mentioned above. If all
else fails, you
can also switch to NAV/GPS mode and use the default GPS, together
with an FS9 flight plan, but this is a poor alternative. You can also
fly the VORs, if not on an RNAV
plan, and your panel supports that. Note that you cannot do this in a
real world 757, 767 or 777 or 747 (you use an FMC plot instead), only
737's
have that direct fly to VOR capability.
For vertical navigation in a
simple panel you could use SPD &
V/S for the climb, but this is unrealistic and actually dangerous or
inefficient, or both. There is no guarantee that you can maintain a
given V/S at a specific speed. If you don't have VNav or even a LVLCHG
mode in your panel,
then you could set the throttles to climb thrust, and then slowly
adjust the V/S control watching your speed like a hawk. You could also
set a climb speed with the SPD setting and set a very conservative V/S,
but you will waste fuel as your climb will be slowed. These are poor
options, here is the better one ...
How to maintain the speed and climb without the V/S control? Here
is the trick - disengage the vertical mode of the A/P, and then just
pitch up & down until you have the correct
speed. Then trim the aircraft to hold that attitude. That is really
all a LVLCHG or VNav mode does in the climb. The plane will then almost
magically continue to maintain that same speed even as it climbs. You see your elevator, not the throttle is
actually your speed control!
So to summarize, for
the climb - set
climb thrust (no SPD mode), adjust your pitch to get climb IAS, and
then trim it to hold it, and then sit back and climb - safely &
efficiently.
Of course your climb rate will gradually reduce as you climb at the
same speed. If you want to increase your climb rate you give it more
throttle, if you have any more. The
Throttle is really your climb/descend control.
If you are
using a complex panel, then be
sure to correctly program the FMC!
(discussed in the next section) Take
the time to learn how to use this valuable tool, the time spent will
pay itself back many times over. You will then be shown exactly
what pitch and bank to fly with the Flight Director bars on the
Navigation Display! All you need to do is put the nose of the aircraft
on the pink cross or chevron. Aircraft cannot give you guidance for
rotation, but certainly once you reach 800ft in the air and a lateral
and vertical mode is selected, you can just follow the Flight Director
Bars. More advanced aircraft can give you FD direction from 50ft AGL.
Much more information on proper takeoff techniques
is found in other training materials.
Departure
Before the take off, you must study the Kennedy1
plate, and in particular the Canarsie climb, and be familiar with it.
The Canarsie climb, and other departures from this busy airspace are
more complicated then you typically see elsewhere. Many departures are
very straightforward, perhaps just runway heading take offs. We chose
this example, so we can cover a number of concepts.
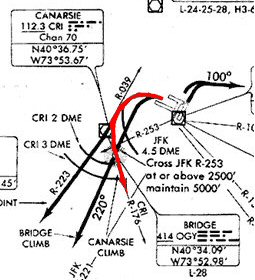
We saw that the
Canarsie cliimb went over CRI (VOR) and then over OGY (NDB) for the 176
radial
of CRI. On take off, as you pass 400ft AGL, start a left turn so you
pass over CRI, then OGY. You can do
this by hand-flying if you wish, or by inputting the data into your
navigation equipment. The path is shown in red in the diagram right.
Shortly after your wheels leave the runway Tower
will hand
you off, “United 123, contact New York Departure on 135.90.” This will
usually be the departure freq you were given in your clearance.
We tune 135.90 and we contact departure,
“Departure, United 123
passing 1500ft climbing 5000ft." Whenever you contact a new controller
you should say your altitude. If in a climb or descent, say your
altitude passing and what altitude you are climbing/descending to.
If you are not on your filed flight plan track already, then you should
indicate your heading. Sometimes you will be speed restricted, if so,
indicate this as well.
Once you are flying a heading of 176 from CRI,
departure will start vectoring you to your exit waypoint, which is
COATE in this flight. You will gradually be cleared to higher
altitudes, on you way up to FL320.
When you are in the air, there’s a basic rule
pilots use that is always appropriate: "Aviate, Navigate, and
Communicate". This means your first priority is safely flying the
airplane, second is going where you want to go and third is talking to
the controller. Don't get so wrapped up talking to ATC that you neglect
the first two!
The Climb
Once past acceleration height, as mentioned above, with climb thrust
set you pitch your nose down to
accelerate to 250 knts, and retract the flaps gradually as you pass the
minimum speed for each flap setting. You continue your climb to
10,000ft at 250 knts, then a
final pitch down to accelerate to your final climb airspeed.
Your final climb speed will vary by aircraft, but you should always
climb
at an IAS
(indicated airspeed) up to FL250 (range of 280 to 340 knts), then
switch to
a Mach Speed (range of 0.72M to
0.84M), up to your cruise altitude. Typical cruise altitudes (travel
distance allowing) for a turboprop are in the FL200's, and FL300's for
the turbojets.
When flying in the Flight Levels up to FL410, in most places of the
world you will
fly on the even flight levels while travelling West, and on the odd
flight levels when travelling East. For example, if you were flying
west from ORD to DEN, FL340 or FL360 would be valid flight levels to
fly.
You might think this is much to remember and
complicated, but once you get the hang of it, you will see that it is
piece of cake.
|