Planning your
Descent
You might think that a descent is pretty easy, once cleared to descend,
you cut the power and
point the nose down. The basics are straightforward, but the finesse is
to fly it in the most efficient and comfortable way. You need to stay
high as long as you can to conserve your fuel, keep your speed up, and
to potentially avoid weather. But you can't wait too long to start your
descent, otherwise you will end up too high as you approach the
airport. Then you will need
to make extensive use of speed brakes, which means that you wasted fuel
to stay high longer than you should have. You also need to respect the
altitude and speed restrictions given to you by ATC.
The old hands will already know the rules to an idle decent, but here
is a place to start. You will obviously descend sooner, the higher you
are. You will want to maintain about a 3° slope on the
way down, that is a 20:1 slope. So you fly 1nm (6000ft) for every 300ft
you drop. That
is the rate descent that most aircraft are designed for.
Although you may rely on
automation, such as VNav or the excellent freeware vasFMC utility, you still need
to be able to do the mental arithmetic yourself, to keep tabs on
things, and to ensure you are on a safe course. It is often useful to keep in mind the approximate
figures of 10nm for 3,000ft descent and 30nm for 10,000ft descent --
you can then quickly "count" along your descent profile.
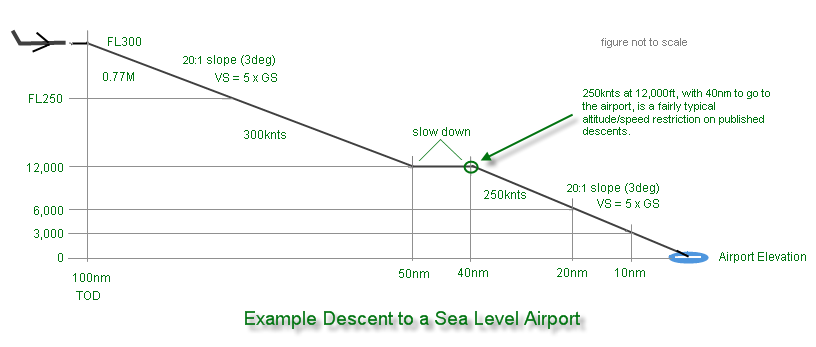
Top of Descent (TOD)
To start your descent, ATC will assign you an altitude restriction at a
waypoint. You may also get a speed restriction, but even if you do not,
you will generally find that aiming for a speed of 250knts at altitude
restriction points at or within 12,000ft of ground level, will work
pretty
well to set up your approach.
The descent clearance will generally be given as "at pilot discretion."
If so, it is up to you when you start your descent, you just need to
meet the conditions given to you by ATC. Occasionally you will be
instructed to start your descent immediately. If you are not certain
what
you are being asked to do, be sure to ask for clarification.
So the TOD is the key thing
to
calculate, you have to know when you need to start your descent. The
basics for
this are fairly simple, but the nuances can be complex. There may
actually be multiple TODs to keep in mind. For example, ATC may have
you descend initially to say FL240, well in advance of your original
calculated TOD. You will now be flying at FL240 for a while, and you
will need to recalculate a second TOD at that lower altitude to guide
you for your next descent segment.
To calculate a TOD, start
by taking
your cruise Flight Level and subtract the elevation that you
need to descend to. That may be the airport elevation, or an
intermediate altitude restriction that ATC has given you.
Then, give yourself three
times the difference divided by ten ... (3 * (Flight Level - target
altitude in hundreds of
feet)/10), plus
an extra 10 miles to slow down, like so:
3 *
((FL - target in 100's)/10) + 10
An example, leaving FL320
descending to 11,000:
3
* ((320 - 110)/10) + 10 = 73nm
If you are allowed
discretion as to when you start your descent, then when at your
calculated top of
descent point, announce to ATC that you will be leaving flight level
320 (in our example here), set the desired altitude to descend to, idle
the
thrust, and then trim your pitch to capture a VS of five times your
ground speed, this will
get you very close to the 3° descent that you want. You will find
in
a well simulated plane, that your airspeed will be reasonable with
these parameters.
If you are using a simple
panel, this is one time that you can use a VS descent fairly safely.
You would set the VS to 5x your ground speed, and monitor your airspeed
to
ensure it is safe. For example, if your panel shows that you have a
ground speed of 450knts, then you should control for a VS descent of
2250 fpm. But, keep watching this, as if the winds change as you
descend, you may need to adjust. This approach technique will correct
for
the winds aloft for you.
You should descend keeping
your
speed in Mach relatively constant, and then at FL250 switch to keeping
a constant
indicated airspeed. At 10,000ft you need to slow to 250knts. Be sure
that when you are entering a Terminal airspace, even if you are still
above
10,000ft, that you are below 250 knots. In some Terminal airspaces you
may be further speed restricted as you descend, the charts will detail
this.
Monitor It!
Sometimes thing can go awry, always keep monitoring your descent path.
Do the math quickly in your head. Just think 30nm = 10,000ft of
descent,
easy to count by 30's. When you have to slow, figure 1nm for 10knts
speed
slowdown, even easier to remember. An approximation, but close enough,
and a handy
figure to
keep in mind towards the end of your approach.
If you think about it, this makes 10 knts of deceleration about
equivalent to 300ft of altitude descent, in terms of distance flown. If
you are stuck a little
higher than you'd like due to ATC, and it is not unreasonble to do
so
operationally, then consider slowing down the aircraft to "buy"
yourself some descent room. 30 knts of deceleration will buy you about
1000ft of descent in terms of distance flown. You will have slowed
sooner than you needed to, but it will keep you from being stuck too
high and fast later on.
Now, you monitor it not only because other factors may affect your
descent, but also because ATC may change your altitude and speed
restrictions, depending on traffic. You may have to rejig quickly to
adapt.
There are other extraneous factors that may throw your descent off, but
these are more advanced issues. These include the
weight of the aircraft (heavier aircraft take longer to start a
descent),
an altimeter that is well off standard (gives you extra/less altitude
to descend through as you cross transition level), the altitude you
start
from (the higher you are the longer you are affected by other variable
factors), but the
largest single issue that you will see is the winds.
Orientation
Well, you always need to know where you are, but it becomes especially
critical as you approach the ground, nasty things live there, and are
waiting
to spoil your day.
All UVA flights are IFR, which means that you should have ATC guidance.
In the virtual world, this is not always the case. When you are flying
without good ATC (VATSIM Live ATC, Radar Contact), then you are on your
own to some extent, and have to establish safe terrain avoidance and
vectoring to the Initial Approach Fix (IAF) for the instrument approach
procedure (IAP). Do not rely on the built in Flight Simulater ATC, it
is neither knowledgeable nor safe. If that is all you have available,
best to just turn it off.
If you are flying without ATC, you should be very
clear on the Minimum Safe Altitude (MSA) for the
area, for the runway that you are approaching. We do watch for this on
checkrides. Normally MSA is only used as a backup procedure, if ATC or
your radio is out, but obviously this can mirror your simulated flight
situation.
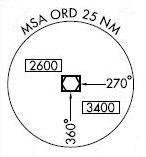
The MSA is always
prominently marked on
any IAP chart as a circle graphic with altitudes corresponding to the
approach direction. This is usually noted as a safe altitude out to
25nm from a navigation station. Unless ATC
vectors you, you may not go below
this altitude until you are established on the published instrument
approach route, which may not be until you intercept the localizer
itself. ATC has lower minimums for certain vectored paths, but as
a pilot you do not have direct access to this information.
Shown at right is the MSA graphic for KORD Rwy 4R. For a distance of
25nm from ORD (Chicago-O'hare) VOR you may safely descend down to no
lower than 3400ft ASL when approaching from the SE, and down to 2600ft
ASL when descending from the other directions. Be sure to set your
altimeter for the correct barometeric pressure, so your altimeter is
reading correctly. ATC should give you the barometric pressure when you
start your descent.
Besides providing safe terrain avoidance, it is very helpful to have a
continuous idea of just how far away
you
are from your destination airport. Any larger airfield will have a
mid-field VOR, or maybe several. Note these and tune them. Make sure
you
are at the right altitude, based on how far away you are, using the
rule explained above.
If you are blessed with a
FIX
page in a complex panel, use it! I
t lets you
draw circles or radials from any two
waypoints or an airport on your Navigation Display, and it persists.
Superb
for
spatial orientation, especially in a busy Bravo airspace, or on final
approach. At a glance you know you should be close to the OM, or when
to drop your speed, or gear or whatever.
As you approach the airfield, you should be about 6000ft above the
airfield level (AFE) at 20nm out, and 3000ft AFE at 10nm. If you are
way off these rules of thumb, you are going to have difficultly
establishing a stable approach, and you know what happens after that!
Of course if you are approaching from the opposite direction, you have
an extra 10nm to 20nm to descend as you will be looping around to land
in the opposite direction. So especially if you are approaching with a
more or less straight-in landing, and with tailwinds, be careful,
you can easily get stuck with too much energy, and end up too high
& fast.
Getting Close
As you get within 20nm of the
runway, start planning your slow down from 250knts and for flap
extension. Do not slow up or extend flaps before this, unless required
by ATC. Always fly 10knts above your flap minimum speed, for safety.
For the 747 fly at the minimum speed for the next flap setting up.
UVA SOP for flaps/speed on approach is 1deg on the downwind (optional,
more for the bigger Boeings), 5deg/180knts for the base and intercept,
15deg/geardown/160knts on glideslope (GS) alive or 9nm whichever is
later,
and then 30deg/Vtgt on GS interception, and no later than the Final
Approach
Fix (FAF).
For the 747 it is a
little different, it is 10deg flaps for the
intercept, and
20deg on geardown.
For the turboprops and light regional jets, it is 1 click of flaps for
the
base & intercept (about 8deg), and 1 click short of full flap
extension (about
22deg) on geardown.
You will find a discussion of the
"Downwind",
"Base" & "Final" parts of an approach in the Pattern Practice section. Vtgt (VSpeed - target) is the wind corrected Vref30
speed, just think
of it as your "target" speed for the approach. Vtgt and other Vspeeds
are fully discussed in
the UVA
Flight Planner (FPD) docs, and touched on in the next class.
flaps & speed settings
|
turboprops
& regional jets
|
jets
|
747
|
on
the downwind
|
clean
|
1deg
(optional)
|
1deg
|
turning
base & intercept
|
8deg/180knts
(slower for a turboprop)
|
5deg/180knts
|
10deg/180knts
|
GS
alive or 9nm, whichever is later (gear
down)
|
22deg/160knts
(slower for a turboprop) |
15deg/160knts
|
20deg/160knts
|
GS
interception, and no later than final approach fix (FAF)
|
45deg/Vtgt
|
30deg/Vtgt
|
30deg/Vtgt
|
VNav - An Advanced Topic
If you have a complex panel, with a full FMC, and access to accurate
winds aloft, then descents are much easier to handle. But, probably
most
folks starting out do not have this, and indeed in a turboprop you
likely will never have this. Nonetheless ...
VNav in the PMDG 747 is
very good at calculating
descents, but you have to give it all the information it needs. One of
the key things missing, if you don't input it, are the winds. If you
have Active Sky or another good source for winds aloft, just grab the
winds
at your destination at 12,000ft, FL240
& 340, and go to the descent page and hit forecast. If you don't
have them, just guess at 1/2 the current wind at your cruise level, you
won't be too far off. Put those winds in,
and you will get a much more accurate descent.
The LDS 767 is a little more quirky with this in my experience, and
unfortunately the PMDG 737 NG simulation (although it will accept it)
will
not use the winds data to change the path.
Unlike its big brothers, the 737 FMS will not intelligently shift
from VNAV spd to VNAV path as required, to finesse the descent, it just
gives up, you can fly it directly using the MCP or handflying it,
recapture the descent, and then
reengage VNav.
But here is a trick. If you don't have the winds aloft data or you are
using the 737 NG (in particular if the prevailing winds are tailwinds),
you may end up high/fast. To get around this, just specify a speed
restriction lower than required. For example, approaching San Francisco
on MOD3,
at CEDES you
might normally set 250knts/11,000ft, instead set it at
210knts/11,000ft!
As you get down towards 11,000ft and the speed tick drops to 210 knts,
you
will find that you now have more room to maneuver. Of course be
very careful not to stall!! The alpha floor protection built into the
VNAV in the 747 will protect against that -- but at this point you will
likely be about to switch to VNav speed intervention mode (or SPD mode
if you must), so it's not a problem -- you will be on top of it.
Another trick, in the PMDG 747 & LDS 767, you can also
overstate the tailwinds or understate the headwinds to give you some
more "room". If you have a headwind aloft of say 60 knts, instead
specify a head wind of only 20 knts. This will achieve the same thing.
A Star
A STAR is a Standard Terminal Arrival Route. It is a standardized
procedure for aircraft flying IFR, that is published for ATC and
pilots, so that the routing approach to a busy airport is more
organized and automatic. Everyone knows what to expect beforehand.
Not all airports have STARs, but large ones will have many.
A STAR will begin
with at least one, and usually multiple
transition points. Think of a transition point as an entry to the
procedure, it can be an exit as well. The traffic will then flow down
like along branches
of a tree "downward" to a central final point, or perhaps several if
the STAR serves more than one airport. Once you are at the final point
(or
often even before that) ATC will vector you to join the IAP (Instrument
Approach Procedure) for your runway.
You will usually find suggested airspeed and altitude
"restrictions" on the STAR, which gives you a speed/point in space to
shoot for as you descend. They may be labeled as "expect ..." in which
case ATC will confirm these, but you can usually expect them. They may
be labeled "fly ..." in
which case once cleared to fly the STAR
by ATC, you fly as per the directions, ATC does not then need to
further confirm the restrictions to you. The charts will be filled with
other useful information that will help guide your approach.
Traditional STARs you could fly entirely by VOR navigation. For
even greater routing flexibility, newer STARs often rely on waypoints
that are
no longer defined along VOR radials,
and to fly these you will need inertial guidance (INS/IRS) or GPS
systems. These are clearly labeled with (RNAV) in the title.
Now, the companion question is, What
is a SID? Well, we looked at one already earlier. A SID is the
same as a STAR, but having to do with your
departure, that is a Standard Instrument Departure procedure.
When flying
checkrides, use of STARs (and SIDs) is mandatory, so you should start
navigating them now.
An example STAR
Let us look at an example,
this is paraphrased from a forum post.
Let's pick a chart, the BDF5 arrival into Chicago (Bradford 5), you can
find a pdf of it here on the myairplane.com site
so you can follow along.
A couple of things to note:
- There are a number of
transitions, or entrances, to this approach. Shown with green arrows
are VORs IRK (Kirksville),
FTZ (Foristell),
STL (St. Louis) and intersection BAYLI.
- The typical approach
on this STAR will have you crossing BDF (Bradford) VOR at FL240 and
BENKY intersection at 11,000ft, these waypoints are circled in green.
Some notations:
- The altitudes between
the listed waypoints are the MINIMUM altitudes for the route, it would
be very rare that you would fly that low during the procedure.
- The numbers in
parentheses are the distances between the waypoints.
- The numbers in the
shield-shaped bubbles are the DME distances to the next VOR. For
instance, KEOKK is marked with an arrow with 60 in the bubble, meaning
that it is 60DME from the
IRK VOR. NEWRK is shown with 52 in the bubble meaning it is 52DME from
the BDF VOR.
- The racetracks at LOAMY,
BDF, BENKY, etc. are published holding pattern locations. ATC may ask
you to hold
over these locations.
- VORs like Quincy (UIN),
Capital (CAP) and Pontiac (PNT) are listed
so you can crosscheck your progress with your NAV radios. Don't forget
to take advantage of that.
So, it is like a tree, going from branches, down to the trunk. There is
a lot of information in these. BDF5 doesn't have a page
two (or three) like many other STARS do, with further explanations,
clearance
requirements, or lost communication paths.
Jeppesen Clinics
Jeppesen produced some procedure plates "clinics"
around MSFS 2002 that
are located here. It may take a bit of time
to read through these, but the information is encylopedic.